All projects
Lumeto Internship / UI/UX design

Scenario Designer Feature Redesign.

Redesigning how educators build interactive VR healthcare simulations.

Case study in progress
Final design preview

Coming soon

MY ROLE
UI/UX Designer Intern
TIMELINE
May – August 2025
TOOLS
Figma · FigJam
PROJECT
Lumeto Internship
01 / Overview

Project overview

Lumeto develops VR simulations that allow healthcare students to practice clinical decision-making in realistic patient scenarios.

Scenario Designer is an authoring tool that enables educators to customize patient conditions, clinical actions, and scenario progression.

I was tasked with redesigning the existing experience, exploring how a visual, drag-and-drop interface could simplify the creation of complex clinical simulations.

02 / The problem

A Complex, Form-Heavy Authoring Experience

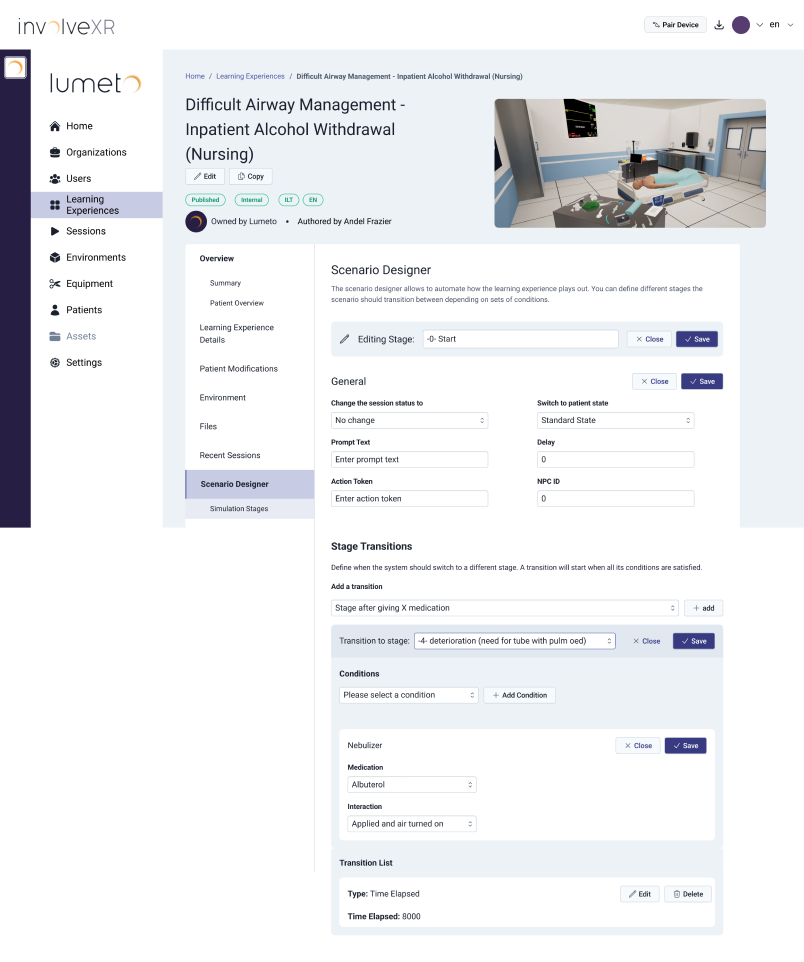
The original Scenario Designer relied on nested forms, dropdowns, and individual settings to configure patient states and transitions, making it difficult to visualize how an entire clinical scenario progressed.

Interface observations
Original Lumeto Scenario Designer showing an Editing Stage row, General settings, Stage Transitions, nested Conditions, a Transition List, and separate Save actions.
Original Scenario Designer · stage editing and configuration
  1. Complex controls

    Numerous dropdowns, inputs, and configuration fields made scenario creation difficult to navigate.

  2. Limited workflow visibility

    Patient states, conditions, and transitions were configured through forms rather than displayed as one connected scenario.

  3. Fragmented interactions

    Multiple settings sections and save actions added complexity to the authoring process.

The initial direction

From Form-Based Configuration to Visual Scenario Building

How might we make complex clinical scenario creation more intuitive and visually manageable?

My Product Manager proposed an open, drag-and-drop canvas where educators could connect and configure blocks representing patient states, actions, and conditions.

Before

Form-Based Authoring

  • Nested configuration forms
  • Separate controls for conditions
  • Limited visibility into the overall scenario
Proposed direction

Visual Canvas

  • Draggable scenario blocks
  • Connected patient states and transitions
  • A unified view of the scenario flow
03 / Research

Exploring Visual Workflow Interfaces

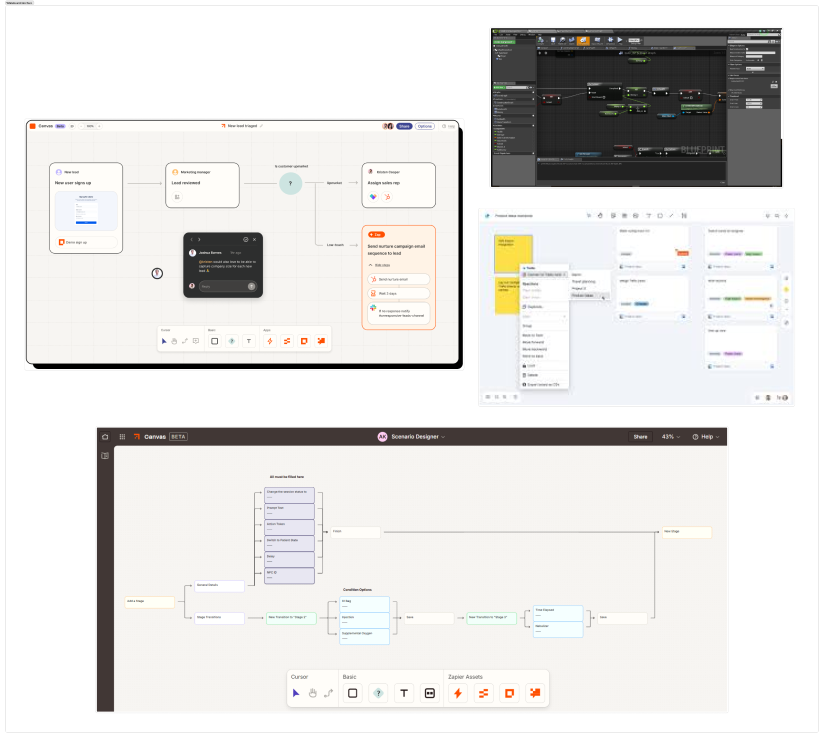
To translate the initial design direction into an intuitive authoring experience, I explored block-based programming tools, clinical simulation software, and visual workflow platforms.

I focused on drag-and-drop interactions, conditional logic, stage transitions, and workflow creation.

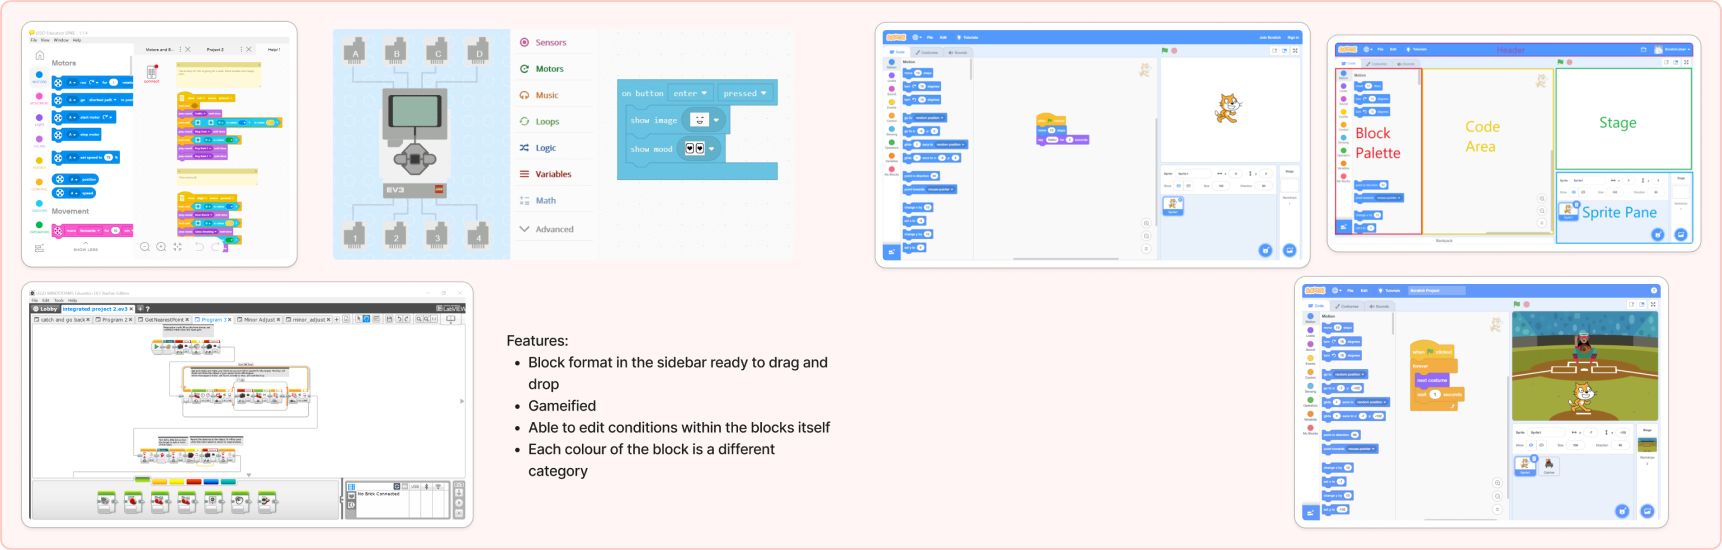
Research collage comparing LEGO coding and Scratch interfaces, including block palettes, nested logic, color-coded categories, and drag-and-drop workspaces.
LEGO Coding / Scratch · original research collage
Block-Based Programming

LEGO Coding / Scratch

What I explored

How users build complex logic by dragging, nesting, and configuring reusable blocks.

What stood out

  • Color-coded block categories
  • Drag-and-drop interactions
  • Inline and nested condition editing

Design consideration

Coding-oriented interactions may need to be simplified for healthcare educators without programming experience.

Relevant takeaway

Explore reusable, visually distinct blocks that make scenario creation more approachable.
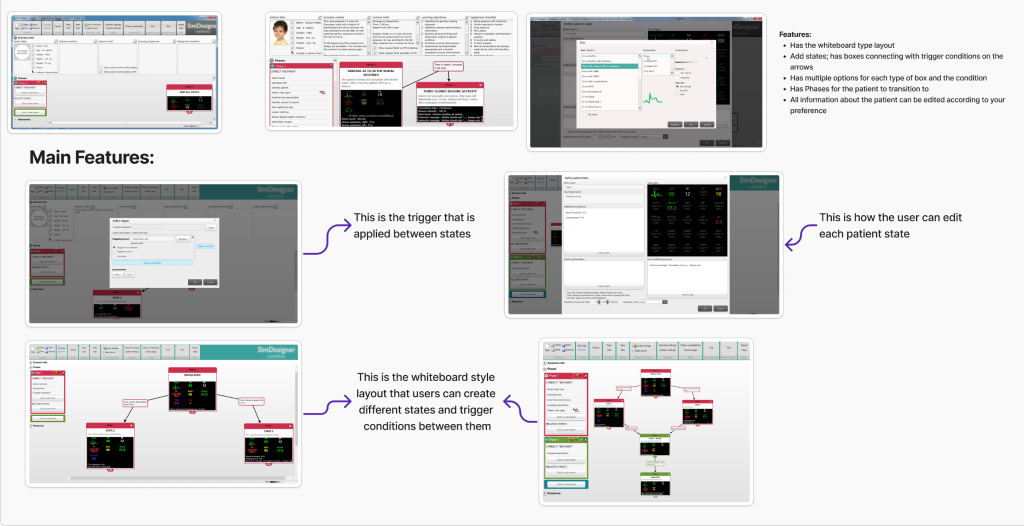
Laerdal SimDesigner research collage with patient-state configuration, conditional transition dialogs, and connected patient states on a whiteboard-style workspace.
Laerdal SimDesigner · original competitive analysis
Direct Competitor Analysis

Laerdal SimDesigner

What I explored

How clinical scenarios are constructed using patient states, conditional triggers, and transitions.

What stood out

  • Visual connections between patient states
  • Conditional stage transitions
  • Configurable patient responses

Design consideration

Balance detailed clinical controls with a clear and approachable authoring workspace.

Relevant takeaway

Make scenario logic and transitions visible while preserving flexibility for clinical simulations.

Visual workflow research collage showing Zapier Canvas, node-based programming, and connected modular workflows.
Zapier Canvas / visual workflows · original research collage
Visual Workflow Inspiration

Zapier Canvas

What I explored

How connected workflows are built on an open canvas, including potential AI-assisted workflow generation.

What stood out

  • Spacious, connected workflow layouts
  • Modular workflow components
  • Potential for a natural-language starting prompt

Design consideration

General workflow builders do not directly account for clinical patient states and simulation-specific conditions.

Relevant takeaway

Explore a visual canvas with the potential for AI-assisted scenario starting points.

Turning Research Into Design Opportunities

Exploring these interfaces helped identify interaction patterns that could make clinical scenario authoring more visual, flexible, and approachable.

  1. 01

    Modular creation

    Reusable, draggable components for clinical scenario elements.

  2. 02

    Visible scenario logic

    Connected patient states, conditions, and transitions on a unified canvas.

  3. 03

    Flexible configuration

    Editable conditions that preserve the clarity of the workspace.

  4. 04

    AI-assisted starting points

    Explore generating initial scenario structures from natural-language prompts.

    Exploratory concept

These opportunities shaped the direction for the design process.

04 / Ideation

From Complex Workflows to a Visual Canvas

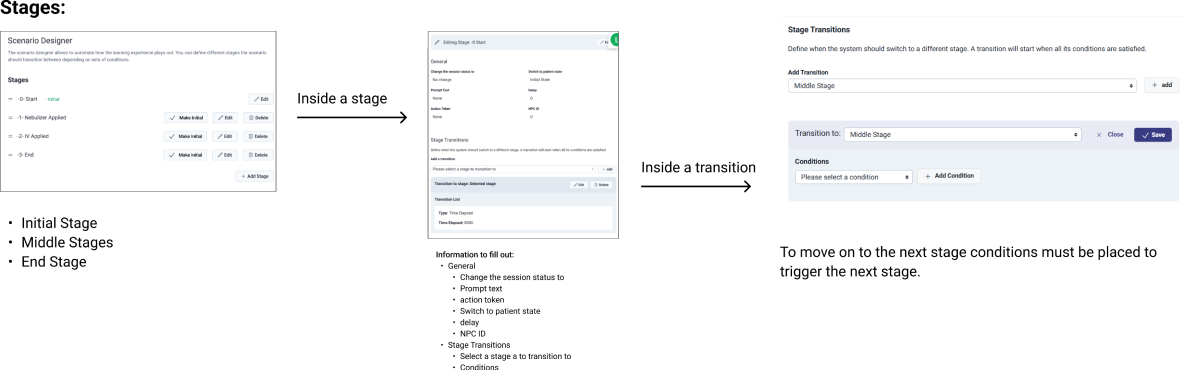
I started by mapping the existing scenario creation workflow to understand how educators configured stages, patient conditions, and transitions. Using these insights, I explored a more visual approach to building clinical simulations.

01 — Mapping the Existing Workflow

I broke down the existing workflow into three key interactions: managing stages, configuring patient settings, and defining conditional transitions. This helped identify how scenario logic could be translated into a connected, visual experience.

Three original Scenario Designer interfaces arranged horizontally: a stage list, individual stage settings, and conditional stage transitions.
Existing workflow — stage management, patient settings, and conditional transitions.

02 — Exploring Stages & Phases

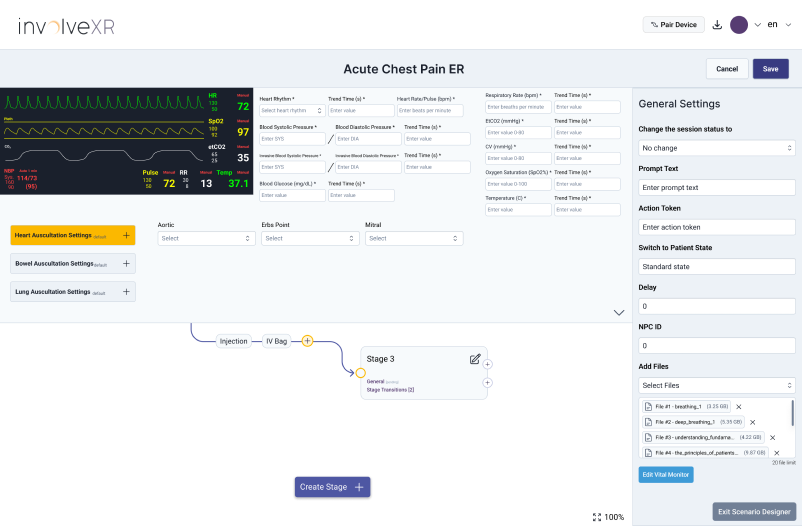
My initial concept introduced phases as the overarching structure, with connected stages representing patient progression within each phase. However, combining detailed settings with the canvas created a cluttered, compact interface that was difficult to navigate.

Phase → Stages → Conditions / Interactions

Initial clinical scenario concept with an expanded vital monitor and patient settings above a compact connected-stage canvas, plus a separate General Settings panel.
Initial exploration — integrating stage configuration with a visual canvas.

What I learnedThe first iteration helped establish the overall structure, but the interface needed clearer visual hierarchy and more space for the scenario-building canvas.

03 — Refining the Canvas

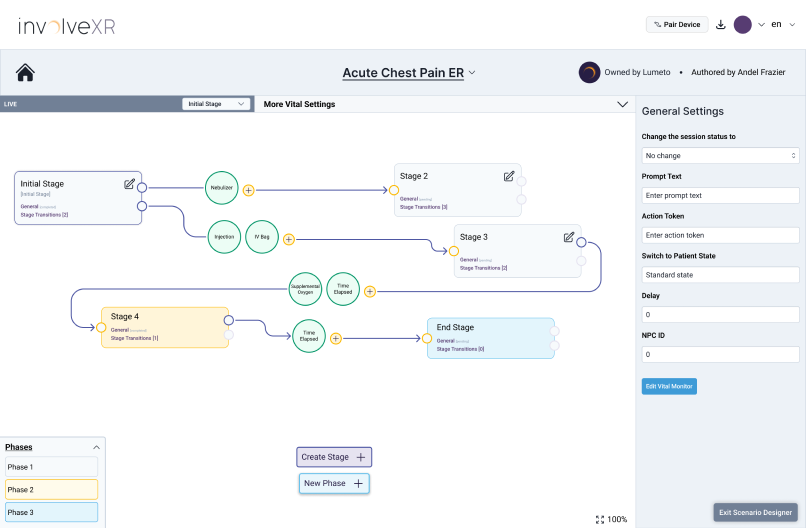
I simplified the layout to give the scenario flow more breathing room, using connected stages and circular interaction nodes to visualize conditions and actions. This intermediate exploration helped clarify which interaction patterns needed further refinement.

Refined intermediate scenario concept with a collapsed vital-settings bar, connected patient stages, circular action and condition nodes, phase navigation, and a General Settings panel.
Refined exploration — introducing connected stages and visual interaction nodes.
  1. 01

    Improved Visual Hierarchy

    Reduced visual density to make the scenario canvas easier to navigate.

  2. 02

    Connected Interaction Nodes

    Explored circular nodes for actions and conditions between stages.

  3. 03

    Feedback-Driven Iteration

    Stakeholder feedback highlighted node colors and add controls for further refinement.

05 / Design

Balancing Clinical Complexity with Usability

As I developed the initial concepts, I experimented with different layouts for managing patient states, stage transitions, and clinical settings. Each iteration helped me evaluate how to balance detailed scenario configuration with a clean, intuitive authoring experience.

01 — Refining the Visual Workflow

I explored an open canvas with connected stage cards and circular nodes representing clinical actions and conditions. This approach made the overall scenario progression more visible while keeping general settings accessible through a side panel.

Scenario Designer mockup with connected stage cards, circular action and condition nodes, phase navigation, and a persistent General Settings panel.
Visual workflow exploration — stage cards, interaction nodes, and settings.
  1. Connected Stage Cards

    Rectangular stage cards and visible pathways made it possible to trace progression across the canvas.

  2. Circular Interaction Nodes

    Circles separated clinical actions and conditions visually from the stages they connected.

  3. Persistent Configuration Panel

    A separate side panel kept general settings accessible while the scenario remained in view.

Feedback & Design Challenges

Feedback on the open canvas pointed to three ways to simplify its interactions.

  • Refine the color system so different elements are easier to distinguish.
  • Reconsider the circular nodes as the way to represent interactions.
  • Reduce visual complexity from multiple add controls.

Key TakeawayMaking scenario logic visible was only part of the challenge; the interactions also needed to feel intuitive and consistent.

02 — Integrating Detailed Clinical Controls

I explored how detailed patient vitals and clinical settings could be incorporated directly into the Scenario Designer workspace. This introduced a dedicated configuration area while preserving the visual scenario canvas underneath.

Scenario Designer mockup with a vital signs monitor and clinical controls above the stage canvas, alongside a General Settings panel.
Clinical controls exploration — expanded vitals and configuration above the stage canvas.
  1. Detailed Patient Configuration

    A vital monitor sat alongside fields for physiological values and controls for heart, bowel, and lung sounds.

  2. Integrated Workspace

    Patient configuration and stage creation shared one workspace, with the stage canvas beneath the clinical controls.

  3. Accessible General Settings

    A dedicated side panel kept broader scenario settings separate from the detailed clinical controls.

Design Challenges

The expanded configuration area revealed a trade-off between clinical detail and visibility of the scenario.

  • Detailed clinical settings occupied much of the workspace.
  • The canvas had less room to show progression between stages.
  • Patient state configuration needed a clearer separation from building the simulation flow.

Key TakeawayDetailed clinical controls needed to remain accessible without compromising the clarity of the scenario-building canvas.

Key Design Considerations

These explorations highlighted the importance of balancing scenario visibility, detailed configuration, and interaction simplicity within a single authoring experience.

  • Clear Interaction Hierarchy

    Stage connections, clinical actions, and conditions needed distinct representations without overwhelming the canvas.

  • Accessible Configuration

    Detailed patient settings needed to remain easily accessible while preserving visibility of the overall scenario.

  • Simplified Interactions

    Feedback on node styling, colors, and add controls highlighted opportunities to make scenario building more consistent and intuitive.

06 / Final design

A More Intuitive Way to Build Clinical Simulations

The final design brings scenario creation into a visual workspace where educators can connect patient stages, configure clinical conditions, and explore different simulation paths. I also designed concepts for AI-assisted creation and previewing, giving educators more ways to build and evaluate their scenarios.

01 — Building Scenarios Through Connected Stages

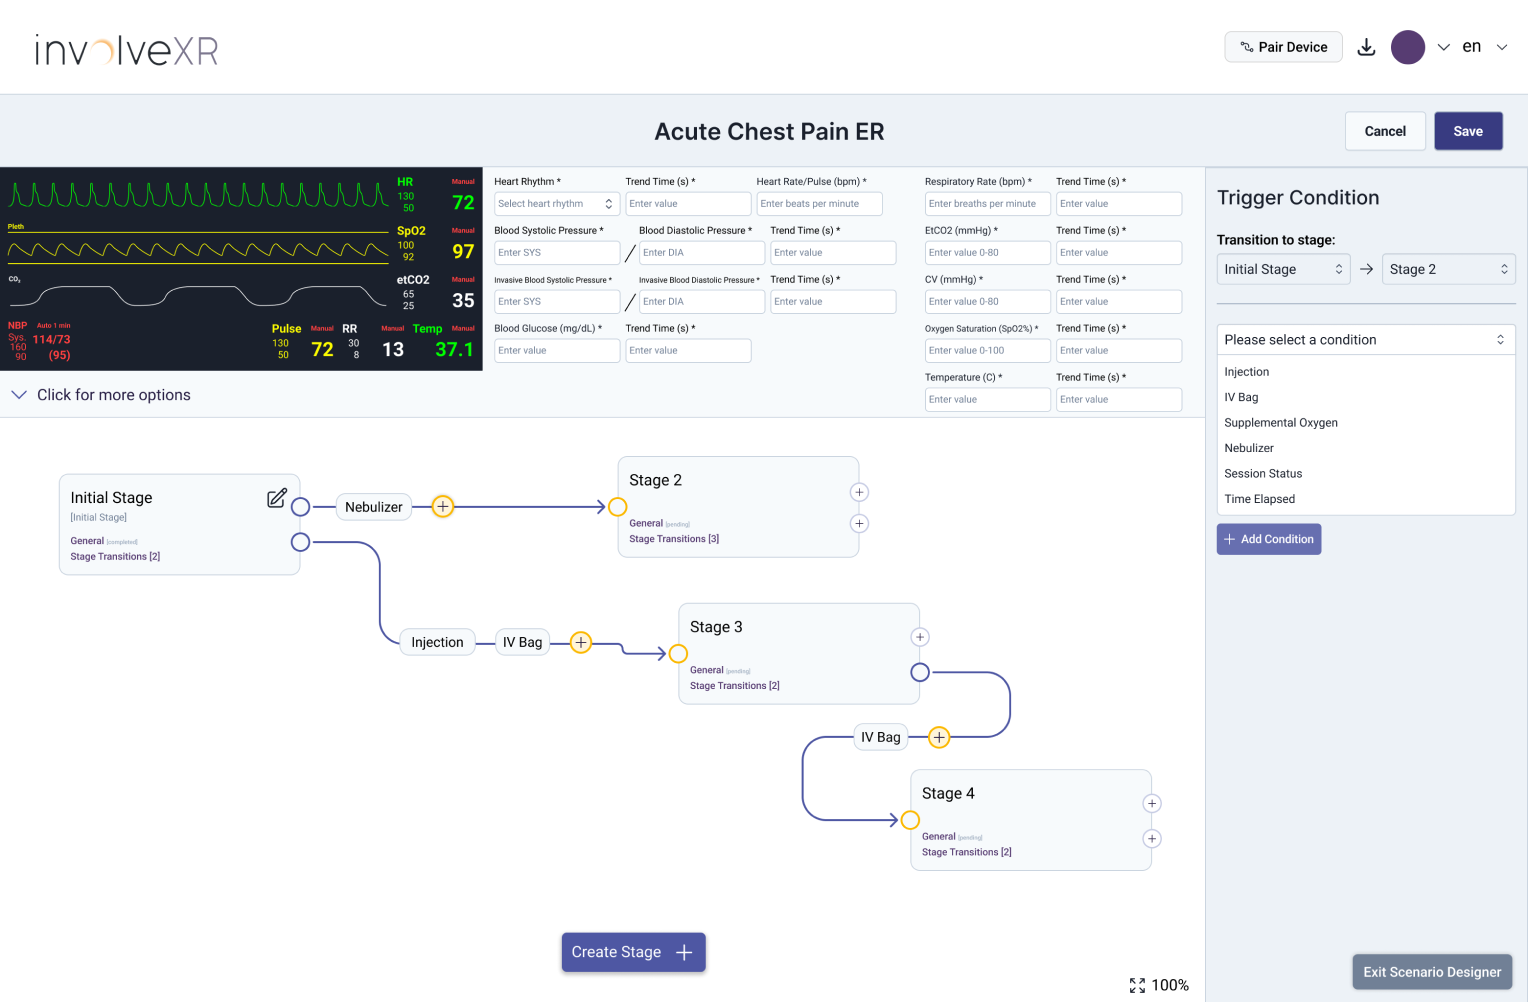
I designed an open canvas where educators can trace patient progression and define what needs to happen before the simulation moves to the next stage.

Scenario Designer canvas with connected patient stages and an open trigger condition dropdown in the right settings panel.
Visual editor with the trigger condition dropdown open.
  1. Connected stage canvas

    Educators need to see how patient states connect. Stage cards and directional lines in the center make the sequence and its branches visible together.

  2. Inline trigger conditions

    Transitions depend on clinical actions or conditions. Compact labels show those rules on the connections, with detailed editing available in the side panel.

  3. Contextual settings panel

    Educators need to edit without losing their place. The right panel shows controls for the selected stage or interaction alongside the canvas.

Clinical controls above the canvas

The vital monitor and expandable physiological settings sit above the workflow. Educators can configure the patient state while keeping that task distinct from defining how the scenario progresses.

Key TakeawayMaking the scenario structure visible while keeping detailed configuration accessible.

Figma concept

02 — Creating a Starting Point With AI

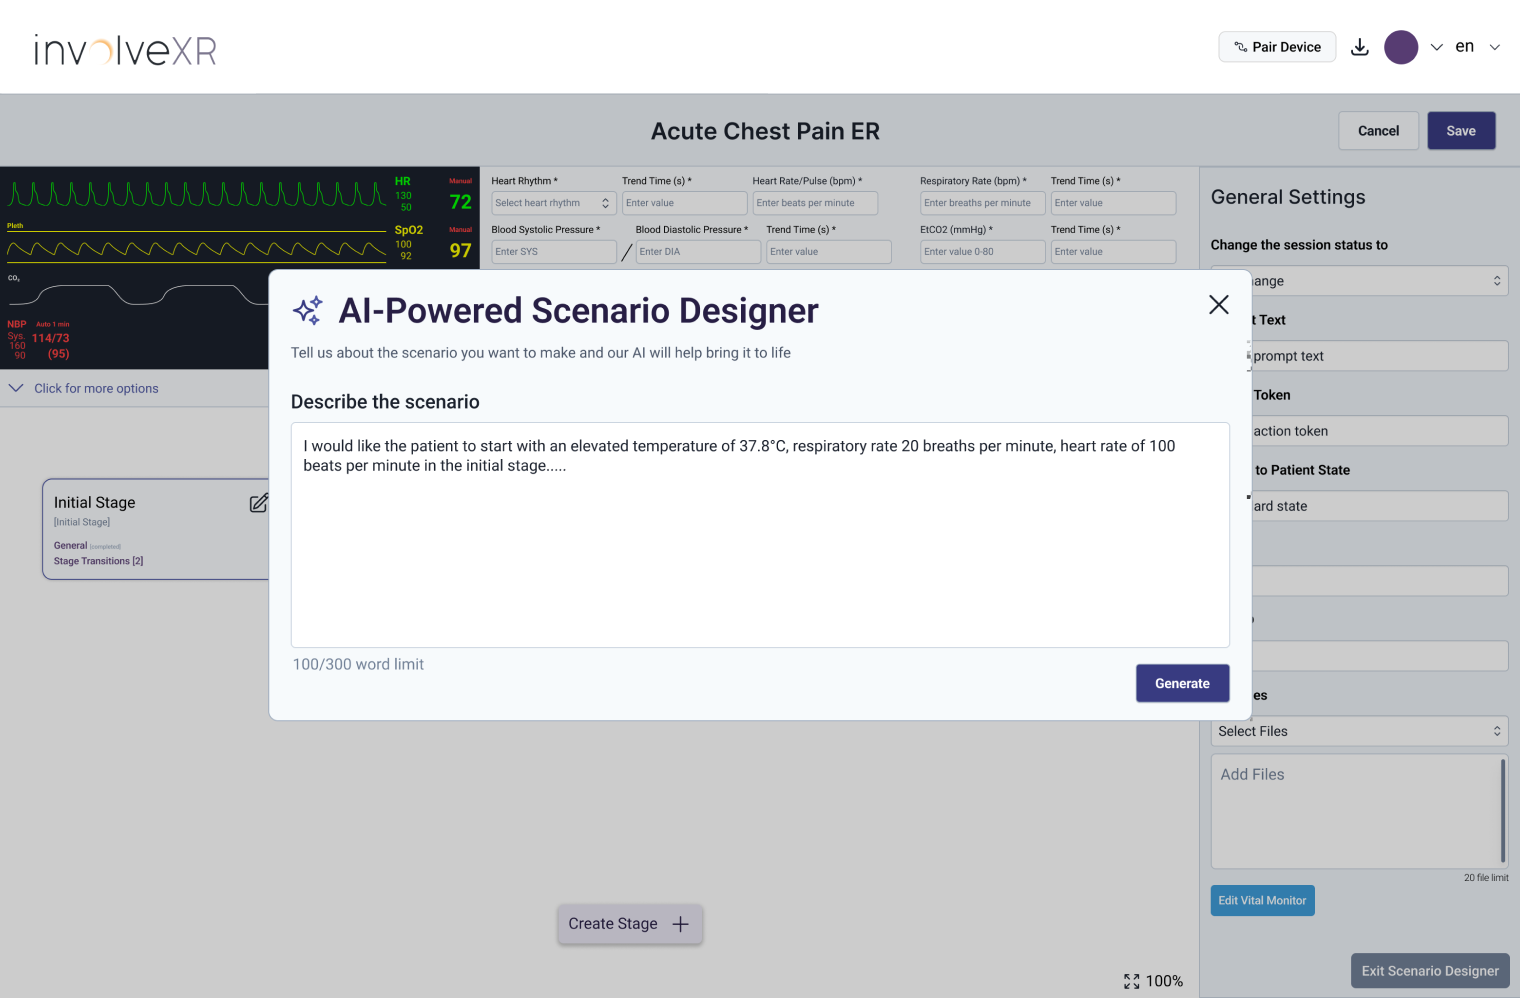
I explored a Figma concept where educators could describe a clinical scenario and generate a starting structure they could then customize.

Centered AI-Powered Scenario Designer modal with a text prompt and Generate action over the editor.
Figma concept for starting a scenario with a natural-language prompt.
  1. Natural-language prompt

    A large text field gives educators room to describe patient conditions, initial vitals, and how the simulation should progress.

  2. Generate action

    A dedicated action makes it clear when the educator is ready to request a draft scenario based on the prompt.

  3. Focused modal

    AI Assist opens from the toolbar into a centered modal. Prompt writing stays separate from the canvas, and educators can still build manually.

Key TakeawayAn optional starting point that leaves educators in control of scenario customization.

03 — Previewing the Clinical Experience

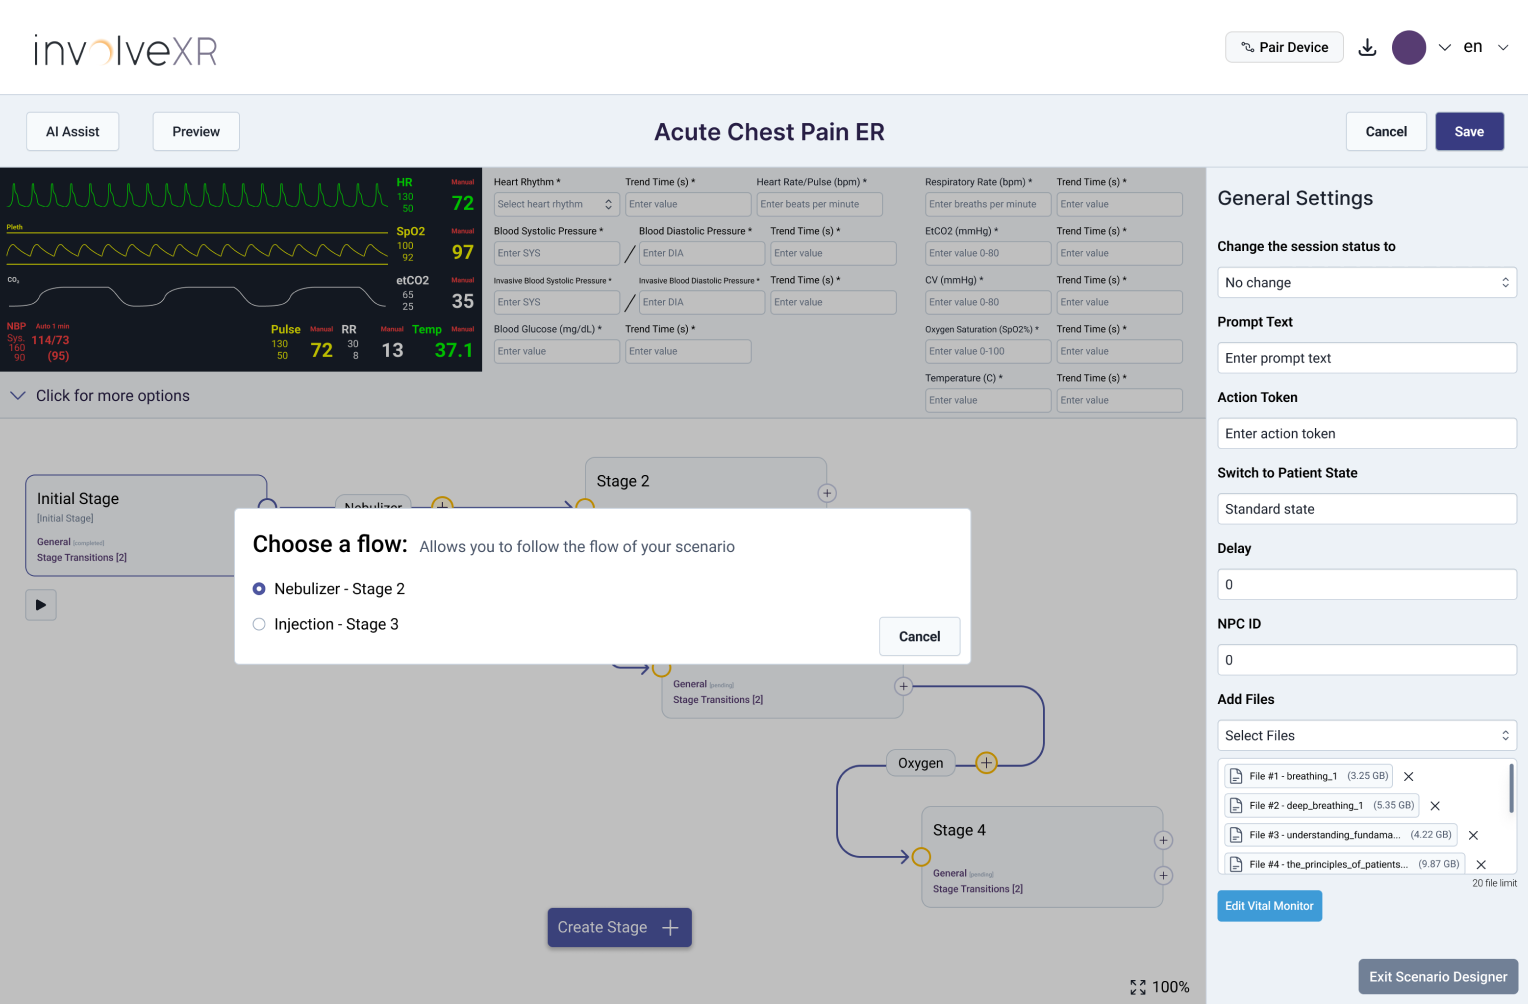
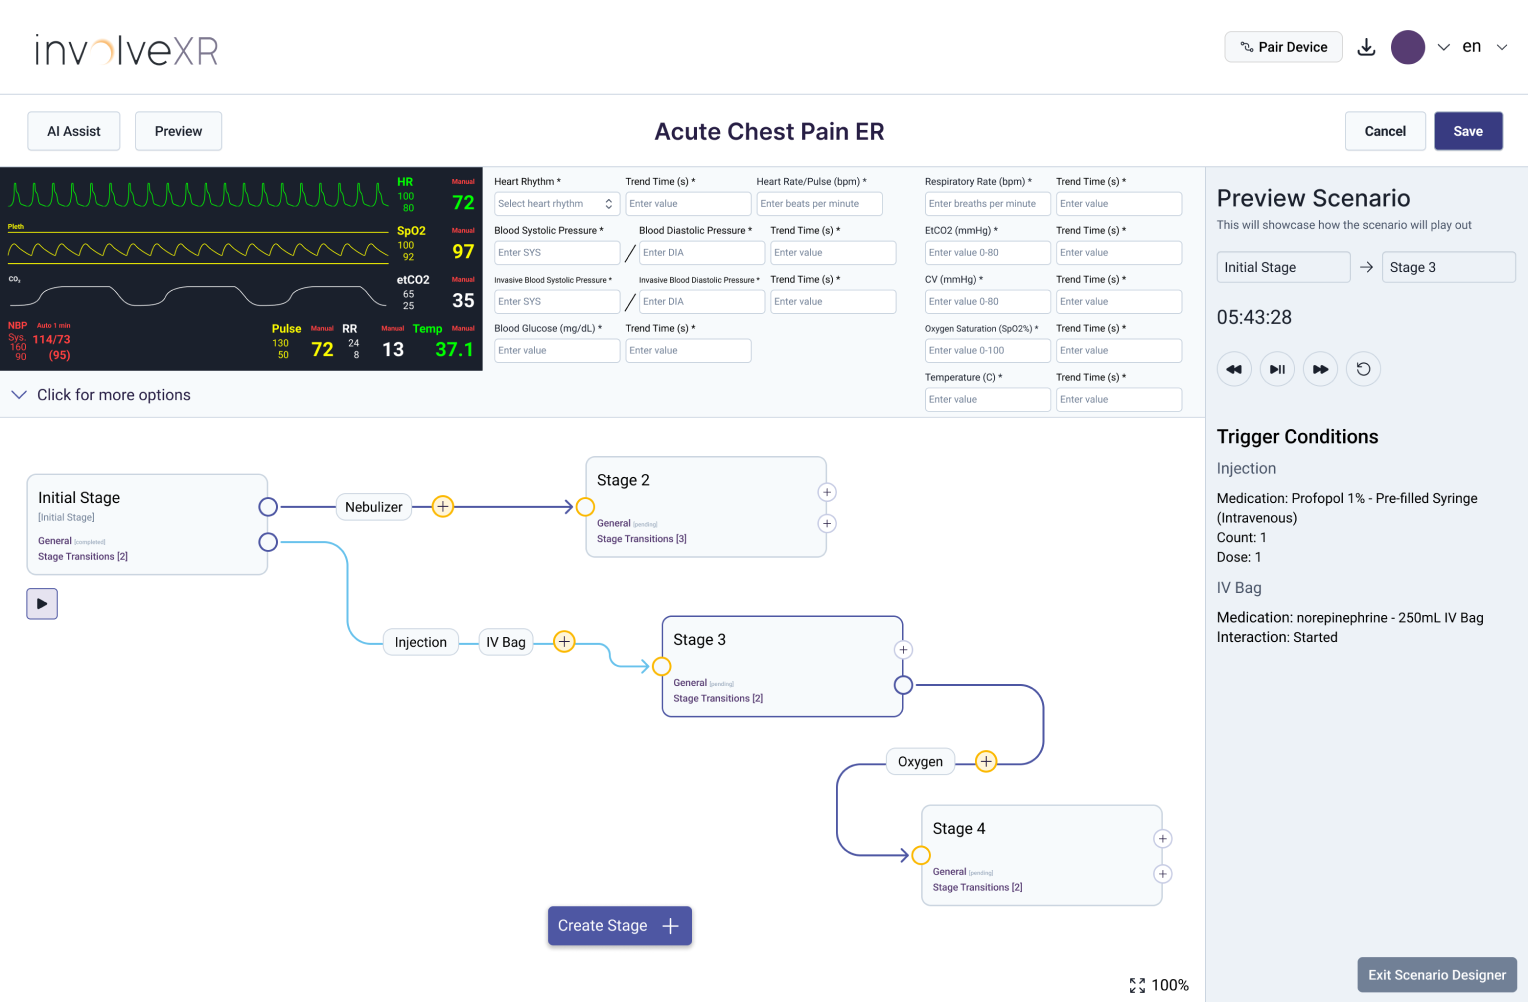
I designed a preview concept that lets educators choose a pathway and inspect its stage transitions, trigger conditions, and sequence of clinical events.

A — Choose a Flow

Choose a Flow modal listing scenario branches available to preview.
Pathway selection before entering the scenario preview.

A selection modal lets educators pick the branch they want to inspect when student actions could lead to different outcomes.

B — Preview the Selected Path

Scenario preview showing the selected Injection and IV Bag pathway highlighted on the canvas, with transition details and playback controls on the right.
The selected Injection / IV Bag path and its trigger conditions.

The preview highlights the selected stage and connection on the canvas, so educators can see where the branch fits in the overall scenario.

  • Highlighted pathway

    Emphasize the active connection so the selected transition is easy to locate among the other branches.

  • Dedicated preview panel

    Show transition details and trigger conditions next to the canvas so educators can inspect both together.

  • Playback controls

    Use familiar playback controls and a time display to help educators review the proposed sequence.

Key TakeawayHelping educators inspect branching scenario logic before using a scenario in training.

Designing Around the Educator’s Workflow

The redesign brings scenario structure, clinical configuration, and pathway exploration into one workspace while giving educators flexibility in how they create simulations.

  1. 01

    Visibility Over Navigation

    Make stages, transitions, and conditions understandable through a connected visual workflow.

  2. 02

    Configuration in Context

    Keep detailed clinical controls accessible without taking focus away from scenario progression.

  3. 03

    Flexible Creation & Exploration

    Support manual building, exploratory AI assistance, and pathway previewing within one interface.

07 / Outcomes

Outcomes & reflections

This part of the story is coming soon.
KEEP EXPLORINGEvacue